Difference between revisions of "Dreamcast"
(updated info for connecting Dreamcast) |
(→Dreamcast aspect ratio peculiarities) |
||
| (18 intermediate revisions by one other user not shown) | |||
| Line 1: | Line 1: | ||
| − | The Sega Dreamcast is a video game console released in November 1998 in Japan and in late 1999 in other territories. The machine was Sega's last home console, it enjoyed modest commercial success and has a large library of games. When integrating a Dreamcast into your gaming setup, the most notable feature of the console is its unusual range of video output capabilities. Various Dreamcast titles can be output in 240p/15khz, 480i/15khz and/or 640x480p VGA/31khz. Not all titles support all screen modes and to get the most out of your Dreamcast library you may need to either cable swap or build a modified VGA box. | + | [[File:Dreamcast.jpg|200px|thumb|right|American Dreamcast console]]The Sega Dreamcast is a video game console released in November 1998 in Japan and in late 1999 in other territories. The machine was Sega's last home console, it enjoyed modest commercial success and has a large library of games. When integrating a Dreamcast into your gaming setup, the most notable feature of the console is its unusual range of video output capabilities. Various Dreamcast titles can be output in 240p/15khz, 480i/15khz and/or 640x480p VGA/31khz. Not all titles support all screen modes and to get the most out of your Dreamcast library you may need to either cable swap or build a modified VGA box. |
== Universal RGB VGA Box == | == Universal RGB VGA Box == | ||
| − | To play games in VGA on the Dreamcast, it is necessary to buy a VGA box or VGA cable specially designed for the console. When using this accessory, normally 15khz RGB is locked out, probably to prevent consumer confusion as very few display devices support 15khz RGB via a D-Sub 15 (VGA) connector. In the case of the XRGB3 and the XRGB Mini too, it is possible to use both 15khz and 31khz through the same cable. By means of a simple hardware modification, most VGA boxes for the Dreamcast can be modified to output both 15khz and 31khz. For more information, [http://forum.arcadeotaku.com/viewtopic.php?f=26&t=1870 see this link.] | + | To play games in VGA on the Dreamcast, it is necessary to buy a VGA box or VGA cable specially designed for the console. When using this accessory, normally 15khz RGB is locked out, probably to prevent consumer confusion as very few display devices support 15khz RGB via a D-Sub 15 (VGA) connector. In the case of the XRGB3 and the XRGB Mini too, it is possible to use both 15khz and 31khz through the same cable. By means of a simple hardware modification, most VGA boxes for the Dreamcast can be modified to output both 15khz and 31khz. For more information, [http://forum.arcadeotaku.com/viewtopic.php?f=26&t=1870 see this link.] If you need a VGA box for your console, the [http://shmups.system11.org/viewtopic.php?f=6&t=44810 Hanzo Dreamcast VGA box] or [http://www.beharbros.com/#!toro/cfom Toro Dreamcast VGA box] has this functionality built-in. |
| + | |||
| + | == Dreamcast aspect ratio peculiarities == | ||
| + | |||
| + | When outputting in progressive scan/VGA mode, the Dreamcast outputs a 720x480p signal, but only uses the inner 512 or 640x480 area of that signal. The result is that the Dreamcast's VGA output is almost always displayed in an aspect ratio that is slightly too narrow. The picture below illustrates the problem. On the left, the picture is uncorrected. On the right, it has been corrected using the horizontal zoom function on the DVDO Edge video processor. | ||
| + | |||
| + | [[File:Dreamcast-squash.jpg]] | ||
| + | |||
| + | To fix this problem, you can use the linearity test on the 240p test suite and increase the horizontal width of the picture using your processor or displays picture controls (where available) until the circles are perfectly round. | ||
== [[XRGB-3]] Specific settings == | == [[XRGB-3]] Specific settings == | ||
| − | With the universal VGA box modification, you can connect the Dreamcast directly to the D in 2 port on the back of the XRGB3. The XRGB3 will then process all incoming signals, allowing you to play all games in RGB with no cable swapping. | + | With the universal VGA box modification, you can connect the Dreamcast directly to the D in 2 port on the back of the XRGB3. The XRGB3 will then process all incoming signals, 15khz and 31khz, allowing you to play all games in RGB with no cable swapping. The downside to this is that the XRGB3 does add some picture noise to the image when running in 640x480 (VGA) mode. Remember to turn the low-pass filter OFF when running VGA games. The alternative is, of course, some kind of RGB switching/splitting arrangement that allows you to bypass the XRGB3 entirely when you are playing VGA games. |
== [[XRGB-Mini]] Specific settings == | == [[XRGB-Mini]] Specific settings == | ||
| − | The Mini's RGB in socket will accept a 31khz signal, but it must be a RGBC signal and not the more common RGBHV that VGA usually uses. It is possible to connect the Dreamcast's VGA output to the XRGB Mini via a sync combiner. If you have the universal VGA box modification too, that means you can play both 15khz and 31khz RGB games, just as with the XRGB3. You could use the [http://wp1114205.wp150.webpack.hosteurope.de/xtcmodified/product_info.php?products_id=57 ArcadeForge UMSA] for | + | The Mini's RGB in socket will accept a 31khz signal, but it must be a RGBC signal and not the more common RGBHV that VGA usually uses. It is possible to connect the Dreamcast's VGA output to the XRGB Mini's RGB IN via a sync combiner. If you have the universal VGA box modification too, that means you can play both 15khz and 31khz RGB games, just as with the XRGB3. |
| + | |||
| + | Your options for connecting the Dreamcast to the Mini are:- | ||
| + | |||
| + | 1) Recommended - Purchase a specially constructed RGB SCART cable that allows for both 15khz and 31khz output. Popular vendors of retro cables now stock these specifically for this purpose. | ||
| + | |||
| + | 2) Build your own sync combiner circuit and adaptor, by modifying VGA box or a SCART cable. There are some details of how to do this here [http://gamesx.com/wiki/doku.php?id=av:dreamcast_480i-480p_scart_cable]. | ||
| + | |||
| + | 3) You could use the [http://wp1114205.wp150.webpack.hosteurope.de/xtcmodified/product_info.php?products_id=57 ArcadeForge UMSA]. This is a VGA to SCART adaptor originally designed for connecting the PC to a RGB SCART display for use with emulation software like MAME. | ||
| + | |||
| + | 4) Use the Shynken/Kenzei adaptor and a Hanzo VGA box, which is specifically designed for this purpose. You can find more details about this by [http://shmups.system11.org/viewtopic.php?f=6&t=44810 visiting this thread]. | ||
| + | |||
| + | 5) Use the [http://www.beharbros.com/#!toro/cfom Toro VGA Box]. This VGA box features both a D-Sub15 and SCART output and allows all signals (240p to 480p) to be routed either to the SCART socket or the VGA/D-Sub15 socket. | ||
| + | |||
| + | 6) Use an Extron RGB interface. These are extremely common on eBay. Make sure to get one with a D-SUB15 (VGA) style input and and not a 9 pin input. The interface will accept RGBHV from the Dreamcast and output RGBC via BNC connectors. You can then connect this into the Mini with either your own custom cable or a simple BNC to RCA adapter on the interface and a SCART to RCA adapter such as this one [http://www.amazon.co.uk/kenable-Scart-Component-Adapter-Converter/dp/B007JISUPS]. Be sure to turn the DDSP DIP switch ON whenever you send a 480i image through the interface. | ||
| + | |||
| + | New Framemeister users often ask if they should use a VGA to HDMI adaptor to connect the Dreamcast. This is not recommended. While this may seem the most simple way to connect the console, in practise this never produces results as good as the above method and introduces many other potential problems. | ||
| + | |||
| + | Below is a screenshot of Guilty Gear X on Dreamcast, running with the following settings:- | ||
| + | |||
| + | Smart x2 mode<br> | ||
| + | H_SCALER = 7<br> | ||
| + | V_SCALER = 6<br> | ||
| + | SHARPNESS = 1<br> | ||
| + | |||
| + | [[File:Ggx_mini_smartx2.jpg]] | ||
| + | |||
| + | Sharpness 1 and H_SCALER 7 may be too much. Using H_SCALER 6 or turning off the Sharpness function may produce better results. | ||
| + | |||
| + | The above settings only work properly in Smart x2 mode. Once you chose another image mode, V_SCALER = 6 is messy, as it does just nearest neighbor scaling and this results in jagged edges and pixel rows of different hight. V_SCALER = 5 is a proper scaling mode. It's a tiny bit softer than the scaling done by the Gefen VGA to DVI scaler, but still nice. Pay attention to the diagonal edges of the ice block in the picture below. V_SCALER = 5 on the left and 6 on the right. | ||
| + | |||
| + | [[File:Ggx_mini-vscaler-5-vs-6.jpg]] | ||
| + | |||
| + | Thanks to Fudoh for these recommendations/observations. | ||
| + | |||
| + | == [[OSSC]] Specific settings == | ||
| + | |||
| + | When using the Dreamcast with the OSSC, ensure that "480p in sampler" is set to "DTV 480p". This should correct the aspect ratio issue described above without the need to use another processor. | ||
| + | |||
| + | If supported by your display, it is also recommended to set H.active to 640 in the advanced timing menu. You may also need to adjust H.backporch and/or your display to centre the image. | ||
| + | |||
| + | If you intend to play 15khz titles regularly on your Dreamcast, it is recommended to connect the Dreamcast to AV1 SCART on the OSSC via a specially modified SCART cable that allows both 15khz and 31khz output from the Dreamcast. The reason for this is that the AV1 input has additional low-pass filtering that 15khz games really benefit from and so you may get a better, more stable picture connecting this way. These cables are available from most major retro video cable sellers. | ||
Latest revision as of 11:57, 1 May 2024
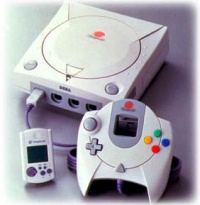
The Sega Dreamcast is a video game console released in November 1998 in Japan and in late 1999 in other territories. The machine was Sega's last home console, it enjoyed modest commercial success and has a large library of games. When integrating a Dreamcast into your gaming setup, the most notable feature of the console is its unusual range of video output capabilities. Various Dreamcast titles can be output in 240p/15khz, 480i/15khz and/or 640x480p VGA/31khz. Not all titles support all screen modes and to get the most out of your Dreamcast library you may need to either cable swap or build a modified VGA box.
Contents
Universal RGB VGA Box
To play games in VGA on the Dreamcast, it is necessary to buy a VGA box or VGA cable specially designed for the console. When using this accessory, normally 15khz RGB is locked out, probably to prevent consumer confusion as very few display devices support 15khz RGB via a D-Sub 15 (VGA) connector. In the case of the XRGB3 and the XRGB Mini too, it is possible to use both 15khz and 31khz through the same cable. By means of a simple hardware modification, most VGA boxes for the Dreamcast can be modified to output both 15khz and 31khz. For more information, see this link. If you need a VGA box for your console, the Hanzo Dreamcast VGA box or Toro Dreamcast VGA box has this functionality built-in.
Dreamcast aspect ratio peculiarities
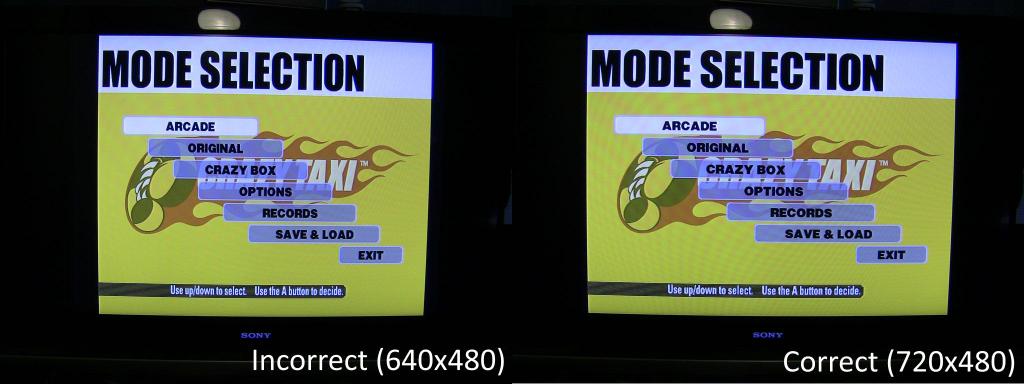
When outputting in progressive scan/VGA mode, the Dreamcast outputs a 720x480p signal, but only uses the inner 512 or 640x480 area of that signal. The result is that the Dreamcast's VGA output is almost always displayed in an aspect ratio that is slightly too narrow. The picture below illustrates the problem. On the left, the picture is uncorrected. On the right, it has been corrected using the horizontal zoom function on the DVDO Edge video processor.
To fix this problem, you can use the linearity test on the 240p test suite and increase the horizontal width of the picture using your processor or displays picture controls (where available) until the circles are perfectly round.
XRGB-3 Specific settings
With the universal VGA box modification, you can connect the Dreamcast directly to the D in 2 port on the back of the XRGB3. The XRGB3 will then process all incoming signals, 15khz and 31khz, allowing you to play all games in RGB with no cable swapping. The downside to this is that the XRGB3 does add some picture noise to the image when running in 640x480 (VGA) mode. Remember to turn the low-pass filter OFF when running VGA games. The alternative is, of course, some kind of RGB switching/splitting arrangement that allows you to bypass the XRGB3 entirely when you are playing VGA games.
XRGB-Mini Specific settings
The Mini's RGB in socket will accept a 31khz signal, but it must be a RGBC signal and not the more common RGBHV that VGA usually uses. It is possible to connect the Dreamcast's VGA output to the XRGB Mini's RGB IN via a sync combiner. If you have the universal VGA box modification too, that means you can play both 15khz and 31khz RGB games, just as with the XRGB3.
Your options for connecting the Dreamcast to the Mini are:-
1) Recommended - Purchase a specially constructed RGB SCART cable that allows for both 15khz and 31khz output. Popular vendors of retro cables now stock these specifically for this purpose.
2) Build your own sync combiner circuit and adaptor, by modifying VGA box or a SCART cable. There are some details of how to do this here [1].
3) You could use the ArcadeForge UMSA. This is a VGA to SCART adaptor originally designed for connecting the PC to a RGB SCART display for use with emulation software like MAME.
4) Use the Shynken/Kenzei adaptor and a Hanzo VGA box, which is specifically designed for this purpose. You can find more details about this by visiting this thread.
5) Use the Toro VGA Box. This VGA box features both a D-Sub15 and SCART output and allows all signals (240p to 480p) to be routed either to the SCART socket or the VGA/D-Sub15 socket.
6) Use an Extron RGB interface. These are extremely common on eBay. Make sure to get one with a D-SUB15 (VGA) style input and and not a 9 pin input. The interface will accept RGBHV from the Dreamcast and output RGBC via BNC connectors. You can then connect this into the Mini with either your own custom cable or a simple BNC to RCA adapter on the interface and a SCART to RCA adapter such as this one [2]. Be sure to turn the DDSP DIP switch ON whenever you send a 480i image through the interface.
New Framemeister users often ask if they should use a VGA to HDMI adaptor to connect the Dreamcast. This is not recommended. While this may seem the most simple way to connect the console, in practise this never produces results as good as the above method and introduces many other potential problems.
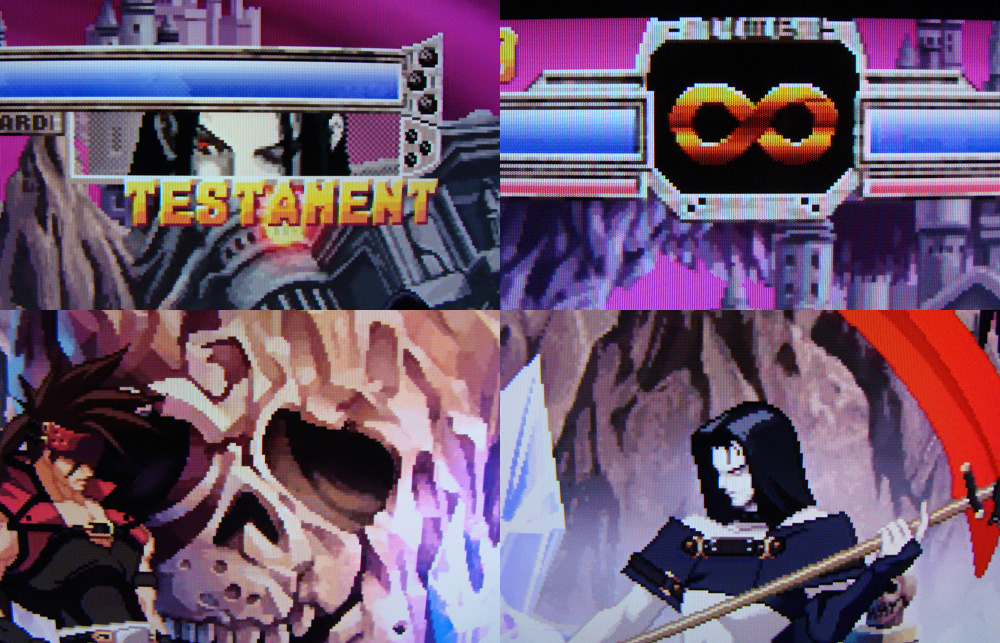
Below is a screenshot of Guilty Gear X on Dreamcast, running with the following settings:-
Smart x2 mode
H_SCALER = 7
V_SCALER = 6
SHARPNESS = 1
Sharpness 1 and H_SCALER 7 may be too much. Using H_SCALER 6 or turning off the Sharpness function may produce better results.
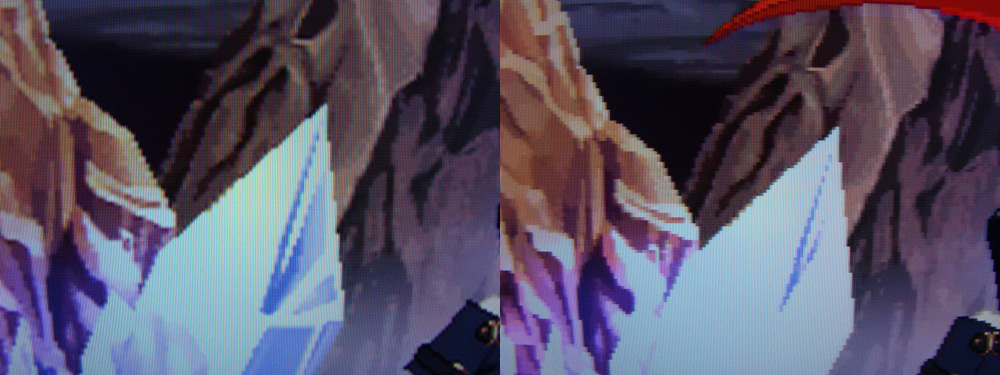
The above settings only work properly in Smart x2 mode. Once you chose another image mode, V_SCALER = 6 is messy, as it does just nearest neighbor scaling and this results in jagged edges and pixel rows of different hight. V_SCALER = 5 is a proper scaling mode. It's a tiny bit softer than the scaling done by the Gefen VGA to DVI scaler, but still nice. Pay attention to the diagonal edges of the ice block in the picture below. V_SCALER = 5 on the left and 6 on the right.
Thanks to Fudoh for these recommendations/observations.
OSSC Specific settings
When using the Dreamcast with the OSSC, ensure that "480p in sampler" is set to "DTV 480p". This should correct the aspect ratio issue described above without the need to use another processor.
If supported by your display, it is also recommended to set H.active to 640 in the advanced timing menu. You may also need to adjust H.backporch and/or your display to centre the image.
If you intend to play 15khz titles regularly on your Dreamcast, it is recommended to connect the Dreamcast to AV1 SCART on the OSSC via a specially modified SCART cable that allows both 15khz and 31khz output from the Dreamcast. The reason for this is that the AV1 input has additional low-pass filtering that 15khz games really benefit from and so you may get a better, more stable picture connecting this way. These cables are available from most major retro video cable sellers.


