Morph 4K
Contents
Updating Firmware
Updating via WiFi
You must complete Wifi Setup in order to proceed
- With the Morph connected to the WiFi, open the main menu and go to System > Firmware > Update Channel.
- Choose either the stable or testing channel (stable is preferred), then click OK on the remote to save this setting.
- Select Check for Update.
- If an update is available, you will see the message "New version is available for download." Press OK on the remote to view the change log and then Press back on the remote.
- If no update is available, you will see the message "Firmware is up-to-date". Press back on the remote to return to the Firmware menu.
- Select Update Firmware and then press OK on the remote to begin the process.
- Morph will first download the latest update to the device and then install it. Please wait for this process to finish before attempting to use or turn off Morph.
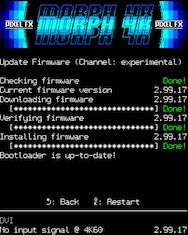
- When the update has finished installing, you will see the message "Bootloader is up-to-date!" as shown in the picture on the right. Press OK on the remote to restart Morph.
- The main menu will appear letting you know the latest firmware has installed. Click OK on the remote to mark this version as valid.
If the firmware fails to download, then try the following troubleshooting steps:
- Confirm Morph's SignalQ percentage, the signal quality strength to the router, is at least ~50% or move it closer to the router
- Confirm the router's 2.4 GHz band is separate from 5 GHz (Morph's WiFi antenna only supports 2.4 GHz)
- Confirm the router's 2.4 GHz band is not using a VPN (the VPN tunnel may slow internet traffic)
- Confirm the router's 2.4 GHz band has the channel set to either 1, 6, or 11 (these are non-overlapping channels; others are more susceptible to interference)
- If everything above is correct, then as a last resort restart the router
- Unplug the power cable/turn off the router
- Wait 60 seconds and then plug the power cable back in/turn on the router on
- Wait at least 5 minutes for the router to reestablish internet connectivity to all devices
These steps should resolve the issue. However if you are still facing WiFi issues, then attempt to update the Morph via SD card instead.
Updating via SD Card
When no WiFi access is available, especially if Morph is on launch firmware v3.0.5, it is possible to update Morph using the microSD port on the front. Morph supports both exFAT and FAT32 formats.
Download Firmware to MicroSD
The latest firmware can be found by going to https://firmware.pixelfx.co/ and selecting Morph4K from the product list. You must have your Device ID ready in order to download it. The Device ID is found either in the Morph menu under System > Info or in the Web Inteface after clicking on Show Device Info. Once you've added the Device ID, choose the stable version (or testing, if you prefer) and click Download Firmware.
Alternatively, when you insert a microSD card into Morph and turn it on, Morph will write a text file to the root of the microSD card called firmware-download-url.txt. This file contains a link that you can use to automatically download the latest firmware from the last chosen Update Channel. This is also another way to retrieve the Device ID via the URL path ...uuid=<Device ID>&pid=morph4k....
After the firmware file has finished downloading, place it on the root directory of the microSD card and rename it morph4k-update.fx. Then safely eject the microSD from your computer and proceed with one of the two update methods below.
Method A. Flash Morph with MicroSD Card
- With Morph turned off, insert the microSD card face up in the front port.
- Briefly hold down the first button from the left (O underneath it) on Morph and turn it on.
- Morph's LED will double-blink red, then double-blink green about five times, and then double-blink yellow continuously. This means the flashing process is underway.
- Once it is complete, the LED will remain white. At this point, you can power cycle the Morph.
- Open the main menu to see from the bottom right-hand corner that Morph is now running the latest firmware.
Method B. Using "Update Firmware from SD Card"
Morph must be on at least firmware version 3.1 to proceed
- With Morph turned off, insert the MicroSD card face up in the front port.
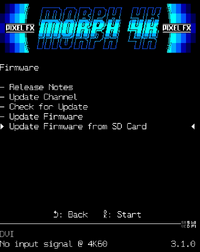
- Open the main menu and go to System > Firmware > Update Firmware from SD Card.
- You will see two fields, Current FW and Install FW, along with the chosen firmware file at the bottom.
- If you see morph4k-update.fx.verified, then click right on the remote once to select the morph4k-update.fx file.
- You can tell the file is correct when the Install FW is now different from the Current FW.
- Click OK on the remote to start installing the firmware.
- Once complete, click OK again to restart Morph.
- The main menu will appear letting you know the latest firmware has installed. Click OK on the remote to mark this version as valid.
- If a morph4k-update.fx.verified file was already on the microSD card, it will be overwritten with the latest firmware version.
Using the Rescue System
In the event of a serious problem with the Morph4K, such as a power failure during a firmware update, you can use the rescue system to re-flash the latest firmware. You may lose some of your saved profiles if you follow these steps.
Rescue System via WiFi
To complete this procedure you will need a laptop or other suitable device that can download and upload files via the web.
Start by turning the Morph off, and then hold down the circle button (first face button from the left) and then turn on the Morph.
You should then see a blinking red LED on the front of your device. On your laptop/smart device, check for a WiFi access point called "Rescue-System" and connect to it. The password for the connection is the same as the SSID, "Rescue-System". Note that if you normally disable DHCP on your device and assign an IP address manually, please temporarily re-enable DHCP in order to use the WiFi rescue system on the Morph.
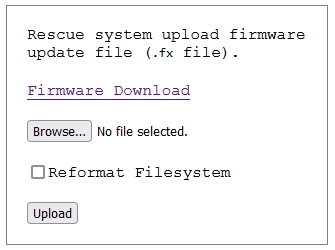
On your laptop/device, go to the following web address http://192.168.4.1/rescue.html. You should see the page shown in the picture below.
Downloading Firmware
If you have a suitable firmware image already downloaded onto your computer/device, you can skip this step and jump ahead to "Uploading Firmware". Otherwise, click on the "Firmware Download" link. This will attempt to open the firmware download page, which will fail since the current access point is not connected to the public internet. Go back into your laptop/devices Wifi settings, disconnect from the Rescue-System access point and reconnect to your usual home broadband WiFi access point.
Once you are reconnected to the internet, refresh or reload the firmware page that just opened. You should now be able to download your firmware of choice, this will usually be the latest stable version unless you have been instructed by PixelFX support to try a different version. Wait for the download to complete, then reconnect to the Rescue-System access point again, and navigate back to http://192.168.4.1/rescue.html (should still be open in the adjacent browser tab on a laptop).
Uploading Firmware
Click on the "Browse" button and locate the firmware image you downloaded before. It's name should appear to the right of the "Browse..." button if you did it correctly.
Selecting the option "Reformat Filesystem" will factory reset the Morph4K, which may be necessary after a failed firmware update attempt. This will, however, delete all of your profiles and stored data from the device. If you have data you wish to preserve, you can try leaving this option deselected. If the update fails, you should try the rescue system again and this time make sure to select "Reformat Filesystem".
When you are ready to proceed, click on "Upload". Please wait patiently while the filesystem formats and/or the firmware uploads and do not turn off the power to the Morph. When the process is complete, you should see a "Successfully Updated Firmware" message on your laptop/device, and the Morph will automatically restart. The rescue process is now complete.
Rescue System via SD Card
If you have difficulty uploading the firmware file to the Morph, you can also place it on the SD card. If you don't have the "firmware-download-url.txt" on your SD card, follow the steps in Rescue system via WiFi to generate the link and then simply copy and paste it and send it via airdrop, instant messenger etc to your internet connected device.
Once you have the link on your target device, paste it into your browser of choice and copy the downloaded file to the root of your SD card. Note that when using the rescue system, the firmware file needs to be renamed to "morph4k-update.fx".
When the SD card is prepared with the firmware file copied to the root of the card and renamed to "morph4k-update.fx", power down your Morph, insert the card, then switch on power while holding the first button on the Morph from the left. The update starts automatically when the file is found and the LED starts flashing: two flashes first green with a longer pause, then yellow.
Once the process is complete the LED will go to a solid white. You can then power cycle the Morph4K and the process is complete.
Common Errors
- Error: -7 :- Usually caused by filesystem corruption, try again with the "Reformat Filesystem" option selected.
- error -18 :- Incorrect firmware. A checksum or device-Id does not match. Start the process again and follow the instructions to download the firmware for your target unit. Do not attempt to use a firmware downloaded on another Morph unit.
Updating the Rescue System
New firmware specifically for the rescue system may occasionally be released. Please only update your rescue system firmware if instructed to do so by PixelFX support. To update the Rescue System firmware, follow the steps below.
- Place the "morph4k-rescue.binc" file, provided to you by PixelFX support, onto the root (top level) directory of an SD card (both FAT32 and exFAT are supported).
- Place the SD Card into the SD card slot on the Morph4k.
- Open up the Morph's on screen menu, and navigate to System->Firmware->Rescue Mode Update.
- You should now see the option "Rescue Mode Update". If you do not, check that your SD card is inserted and that you copied the update file correctly.
- Select "Rescue Mode Update" and hit "OK" and then "OK" again to confirm.
- When the update is complete, you should see the message "Rescue update successfully finished!". Press the back button and the process is complete.


