Difference between revisions of "Morph 4K"
m (→Wifi) |
m (→Wifi) |
||
| Line 313: | Line 313: | ||
==== Wifi ==== | ==== Wifi ==== | ||
| − | Use this menu to setup the Morph4K on your local WiFi access point, or to view the current status of the WiFi connection. | + | Use this menu to setup the Morph4K on your local WiFi access point, or to view the current status of the WiFi connection. See [[Morph_4k#WiFi_Setup|WiFi Setup]] and [[Morph_4k#Web_Interface|Web Interface]] for more information. |
==== Firmware ==== | ==== Firmware ==== | ||
Revision as of 16:05, 25 February 2024
!! This page is work in progress !!
Contents
- 1 Introduction
- 2 External Inputs, Outputs and Ports
- 3 Internal Ports
- 4 Basic Setup & Usage
- 5 Console Connection Basics
- 6 Using another scaler as an analogue bridge
- 7 Main menu options
- 8 WiFi Setup
- 9 Web Interface
- 10 Updating Firmware
- 11 Compatibility and Special Configuration
Introduction
PixelFX Morph 4K is an advanced, modular scaling solution based around a powerful FPGA architecture. The device has been designed to bring powerful, flexible 4K scaling tailored for video game material to users at an affordable cost.
By being modular in design, the unit can be customised to a users exact needs and setup, therefore saving the end user considerable expense. The base unit has 1 x HDMI input, but add on modules (coming soon) will allow the device to be expanded to accept all kinds of analogue signals too.
Features
- Up to 4K60 resolution polyphase upscaling
- 4:4:4 end to end color support
- HDR, Variable Refresh Rate, Black Frame Insertion
- Ultra low lag
- Motion adaptive deinterlacing
- Scanlines, adaptive scanlines and slotmask emulation
- Image Smoothing (including XBR)
- USB socket (for future use)
- WiFi updates
- WebUI system control
- Control by IR remote, web interface or CEC
- MicroSD card slot for updates and user files
- Expansion card support, modular design
Board versions and availability
As of February 2024 Morph is not launched yet, however it is expected to be released soon, with testing currently being done on release candidate firmware.
Pre-assembled boards are to be sold worldwide by:
Other resellers are expected to be added post launch.
More information & discussion
External Inputs, Outputs and Ports
USB-A Port
The base unit has 1 x USB port at the rear. This port is currently unused, but will be used in future to control AV switching hardware.
HDMI in
The HDMI input port is located directly to the right of the USB port. The port will accept up to 1080p video at 60 frames per second with a 4:4:4 colour space.
The base unit Morph has 1 x HDMI input only. For HDMI equipped consoles, such as Xbox 360, PS3, or HDMI modded consoles such as those equipped with a RetroGEM, these devices can be connected directly to the Morph 4K or used via a HDMI switch.
For devices which output analogue signals, an existing analogue to digital scaler, such as an OSSC, can be used as an "analogue bridge". As the Morph is modular, additional inputs can be added in the form of expansion cards. These expansion cards are currently in development.
HDMI out
Standard HDMI video output port capable of outputting up to 4K video at 60 frames per second in 4:4:4 colour space. Located between the HDMI in port and the power connector.
Power connector
Standard USB-C power connector, the Morph requires a 5 volt power supply with at least 1.5 amps of current. Please note that if you intend to use only the base unit Morph, a power supply capable of providing 1.5 amps of current is sufficient. However if you intend to use the device with expansion cards, choose a power supply that can provide at least 2.5 amps instead.
MicroSD Port
A MicroSD card can be inserted at the front of the unit. This can be used to store profiles and other data and also to update the unit when a WiFi connection is not available.
Internal Ports
Expansion connector
High bandwidth connector suitable for connecting a wide range of expansion modules to expand the Morph4Ks input and output capabilities.
Display header
For connecting an optional character display (not currently supported).
Basic Setup & Usage
Connect your Morph 4K to a HDMI compatible TV or monitor using a standard HDMI cable. Remember to use a cable rated for 4K video if you are using a 4K display.
Connect a HDMI source to the HDMI input port of the Morph4K and connect a suitable power supply to the USB-C connector. Power on the Morph using the switch at the front left of the unit, and verify that your display is set to the correct input. You should now see a "No Signal!" message on your display. Power on the connected HDMI source and it should instantly be displayed through the Morph.
The Morph ships with a basic IR remote control unit, as shown on the right. If desired, a more advanced remote control can be used instead, either via IR or CEC. Remote control through WiFi is also possible once WiFi setup is completed. See Remote Control Setup for more information (insert data).
The remote control requires 2 x AAA batteries, these are not included due to postage service restrictions. Insert 2 x AAA batteries into the remote (IR remotes have a low power draw, so rechargeable batteries are perfect) and press the "Menu" button (house icon) to toggle the Morph's menu on or off.
Buttons on the basic remote
The included remote uses the following buttons as of the current firmware. More functionality may be added in future firmware updates.
- Menu - The button with a small picture of a house on it is the Menu or Home button. This button will toggle the Morph4K's on screen menu on or off. If you navigate to a sub menu option, the button will take you instead to the previous menu. Keep pressing the button to navigate back to the top level menu and then to dismiss the menu.
- Back - This button will take you back out of a sub menu, without applying the changes.
- Navigation - Use these directional controls to navigate through the menu options and to change values in the menus.
- OK - The OK button in the middle of the navigational controls confirms a menu item change. Remember to press OK if you wish to keep an optional change, if you simply press "Back" the changes will be discarded.
- Shortcut buttons - The coloured shortcut buttons at the top of the remote perform various functions depending on the selected menu. For example, when configuring scanlines, you can use the yellow and blue buttons to quickly increase the value by 10 units.
Setting up your new Morph4k
If you have a WiFi connection available, it is recommended to setup the WiFi connection and check for any firmware updates. Morph is a new product and regularly receives new firmware updates. See the section WiFi Setup and Updating Firmware for more information.
Your next step should be to check that the Morph is outputting the most suitable resolution for your TV or monitor. Navigate to "Video" on the Morph's main menu and them to "Output Resolution".
Use the remote to select the desired resolution then press "OK". If your display cannot accept the chosen resolution, Morph will reset to the previous resolution after 30 seconds. If your display is unable to accept a 4K signal from the Morph, despite being rated for 4K use, please check that your HDMI cable is rated for 4K.
Usually you would choose the highest resolution that your television can support. Typically for a 4k television, you would choose "4K" as the output resolution. However, if you want to use the Black Frame Insertion feature (Insert data) you would choose "1080p120" instead.
You are now ready to start exploring the functionality of the Morph4K. For an overview of what you can do with various sources, proceed to the next section.
Console Connection Basics
Morph can accept and process signals from a huge range of games consoles, computers and even video equipment. The focus of the Morph is for scaling and processing video games although it can also be useful in some instances for processing video material too. Below is an overview of different types of consoles, how they connect to the Morph and how you might wish to process them with the device.
Pre HDMI gaming consoles and computers
This category encompasses all games consoles before the seventh generation, and some seventh generation machines such as the Nintendo Wii and the original launch Xbox 360. Typically these machines will connect to the Morph in one of three ways.
- By a HDMI mod or adapter, either a hardware modification (such as RetroGEM) or an external adapter
- By use of another scaler as an analogue bridge (see Using another scaler as an analogue bridge)
- By use of an expansion module fitted to the base Morph unit
Usually, using either a good quality HDMI mod or adapter or the dedicated analogue expansion card on the Morph will yield the best results. Using a secondary scaler such as an OSSC can also produce excellent results however.
To connect using a HDMI mod, HDMI adapter or secondary scaler, use the adapters "pass-though" or "digitization only" mode if one is available. If no pass through mode is available, choose the lowest output resolution offered by the adapter/scaler and then use the "Prescale" options under the "Scaler" menu on the Morph to effectively undo any scaling the adapter applies (insert further data).
For specific considerations for each system, see Compatibility and special configuration
What can the Morph do for Pre-HDMI consoles and computers? These machines were typically designed for older displays (especially sixth generation and earlier systems). Morph4K can properly scale and process these systems and add CRT effects such as scanlines, to make them look as pleasing as they did on legacy CRT displays. For systems which output interlace video (e.g PS2) Morph4K has a fast, motion adaptive deinterlacer that is optimised for video game content.
Seventh and eighth generation consoles & gaming PCs with max 1080p output
Systems such as Nintendo Wii-U, Xbox 360 (later revisions) PS3 and gaming PCs from this era typically output up to 1080p/60 via digital/HDMI connections. The Nintendo Switch would also fall into this category. Systems like PS4 which can output higher resolutions and/or HDR have special considerations and will be discussed in the next section.
What can the Morph do for these systems? These machines were typically designed for more modern displays, however the Morph gives you more control over both 1080p and 720p scaling and can produce better results than the scalers that are built into many displays.
Systems such as the PS3, Xbox 360 and Nintendo Wii-U/Switch, which frequently or primarily target 720p, can be upscaled by the Morph to produce either a significantly sharper or smoother image depending on the users preference.
Emulated titles or pixel art style games titles on these platforms (e.g Virtual Console) can be reprocessed by the Morph to correct bad scaling or to add scanlines or CRT filter effects.
Eighth and ninth generation consoles and modern gaming PCs
Modern video games consoles and PCs output higher than 1080p resolution. These resolutions cannot be directly processed by the Morph. If you wish to use these systems with the Morph, without limiting their output capabilities, then you will need some way to split or switch their output so that you can bypass the Morph. Remember that many HDMI splitters or switches are not compatible with variable refresh rate that these systems can use.
Many PC graphics cards offer multiple monitor outputs, so in this case it is easy to connect one monitor output to the Morph and the other directly to the display.
What can the Morph do for these systems? Emulated titles or pixel art style games on these platforms can be reprocessed by the Morph to correct bad scaling or to add scanlines or CRT filter effects.
Using another scaler as an analogue bridge
The Morph4K can be placed into your setup between your display and an existing scaler to instantly upgrade your setup with 4K scaling capabilities. This is an ideal option for anyone who is already happy with their existing analogue switching/scaling solution and just wants a simple, low hassle upgrade path to 4K.
For best results with your existing scaler, set the unit to output in "Passthrough" or "Digitisation Only" mode. This will allow the Morph 4K to handle all of the scaling and will produce the best results. If your existing scaler does not support this, use 480p output mode instead and set a /2 vertical pre-scale on the Morph (Main Menu->Video->Scaler->Vert. Prescale = /2). Note that this may mean that your existing device also deinterlaces 480i/576i content, meaning the Morph cannot use it's own deinterlacer.
Some HDMI switches may not support 240p via HDMI. In this case, you can use 480p mode instead and a 2 x vertical pre-scale.
The following devices have a pass through mode and therefore are ideal for use with Morph4K.
- OSSC Classic - Click the link for instructions on how to activate pass through mode
- OSSC Pro - Use in pure or adaptive line multiplication mode, then configure the same as OSSC classic
- RetroTINK 2x Classic
- RetroTINK 2x Pro - Set the Mode switch to "Pass".
- RetroTINK 5x - Follow the instructions to activate downscaling mode by using the guide here
The following devices do not have a pass through mode and so should be used with a 2 x vertical pre-scale instead.
- RetroTINK SCART
- XRGB3
- XRGB Mini Framemeister
Advantages
- Cost - By making the most of your current investment, Morph4K gives you the lowest possible cost for 4K retro gaming scaling.
- Ease of installation - Few changes should be required to your current setup to integrate Morph4K. Any existing analogue switching hardware can be re-used.
Disadvantages
- Added lag - Frame buffer based scalers may introduce lag, this lag will be added to your video chain. Line multipliers generally do not add lag so this disadvantage would not apply to those devices.
- Inherent flaws of some scalers cannot be mitigated - For instance the XRGB Mini Framemiester is known to add noise to some signals, this will still apply when using it with the Morph4K, of course.
- Resolution changes will still incur a delay - Scalers like the XRGB Mini Framemiester has a very long delay between switching between 480i and 240p content, this will still apply when using the unit with the Morph. Line multipliers like the OSSC and RetroTINK 2x work much better, because the Morph will actively keep the connection with your display while it waits for the line multiplier to resync. However, the dedicated analogue bridge will still perform slightly better in this regard.
- Remote control - Morph4K cannot remotely control your existing scaler, for example to select a different input. Using an alternative remote control with custom programmed IR commands could get around this limitation.
Presets
The Presets menu is found at the top of the main menu. This menu can be used to load saved profiles. Simply navigate to the profile you wish to load.
Note that it is currently only possible to save custom presets using the web interface. The ability to save presets using the remote will be added in a later update.
Restore default settings
Removes all scanline, mask and custom scaling settings.
Input
Choose your input source here, on the base unit there is only 1 x HDMI input, so this menu is redundant.
Video
Use this menu to adjust various video output options, scaling and smoothing.
Scaler
The scaler menu contains options that directly affect the scaled image
- Zoom - Use this option to zoom the image to the required size. You can use the left and right controls for a large increment, or the yellow and blue buttons for a small increment
- Aspect Ratio - Sets the proportional relationship between an image's width and height. Many retro gaming systems use a 4:3 aspect ratio, while more modern systems use 16:9
- Horiz. Interpolation - Sets the sharpness of the horizontal scale, use this control to fine tune the scaling to your taste
- Vert. Interpolation - Sets the sharpness of the vertical scale, use this control to fine tune the scaling to your taste
- Horiz Prescale - Allows for the reduction of the horizontal resolution of the HDMI input. Can be used to correct bad scaling applied by the connected system. Known as "Input Decimation" on some other scalers
- Vert Prescale - Discards scanlines from the source image resulting in a loss of vertical resolution. This is typically used with pre-scaled content or pixel art video games to create a more accurate scanline presentation (insert more data here).
Shift / Crop
Use these controls to shift or crop parts of the image. The crop controls are useful for removing decorative borders from some 4:3 content that has been pillarboxed to fill a 16:9 image, for example.
Deinterlacer
Deinterlacing is the process of converting interlaced video to progressive video. Modern fixed resolution displays cannot display interlace video directly, and this content must be deinterlaced first, either by the deinterlacer built into the display or an external device, such as the Morph 4K.
- Bob - Also known as line doubling, takes the lines of each interlaced field (consisting of only even or odd lines) and doubles them, filling the entire frame
- Blend - Creates frames by by averaging lines from the two most recent, can produce ghosting effects
- Weave - interleaves consecutive fields together into a single frame, can cause combing artefacts.
- Motion Adaptive - Uses an algorithm to determine the best deinterlacing solution for each part of the image.
- Simulate CRT - Uses Bob deinterlacing but also more closely simulates a CRT (how? Insert data)
- 2:2 Telecine - Creates progressive video output from 480i games that run at 30 fps. May be useful for certain PS2 titles
For most sources, Motion Adaptive deinterlacing is recommended.
Smoothing
Use the options in this menu to apply additional smoothing to the image. These routines go beyond the softness controls in the Scaler menu to further process the image. (insert data on available options)
Retro FX
The Retro FX menu is where you apply scanlines and masks. Since Retro gaming consoles were designed around cathode ray tube (CRT) displays, Retro gaming video content looks more authentic (and therefore subjectively better) when presented with simulated picture effects that mimic the characteristics of these displays.
Scanlines
Both horizontal and vertical scanline options are available. A classic CRT monitor draws the image using an electron beam gun and would have scanlines only in one direction, however both can be applied at the same time if desired. Many arcade game titles used CRT monitors in a portrait orientation and would therefore have vertical scanlines.
Both Horizontal and vertical scanlines can use the following options:-
- Off - Turns the scanline engine off entirely
- On - Draws a basic scanline
- Adaptive - Draws a scanline that simulates bloom or thickness where the image is brighter
Scanlines can be tweaked with the following parameters:-
(insert data)
- Saturation
- Strength - Adjusts the maximum width of the scanline effect
- Thickness (basic only)
- Glow (adaptive only) - Adjust how much the thickness or bloom effect will change at bright points on the image
Mask
The Morph4K can also emulate sub-pixel "Mask" effects such as [shadow masks] or [aperture grills]. These are most effective at 4k output resolutions. Toggle the Mask option on or off to apply mask emulation.
- Type - Choose your desired mask under "Type". The Morph comes with several presets, and more can be added via the web interface (insert data)
- Transform - Mask effects can be rotated or flipped using this control
Some mask effects are designed to work with scanlines applied too, while others will look better when used in isolation.
Gamma Adjust
This control can be used to make the image brighter. Increasing Gamma may compensate for brightness lost when applying scanlines and/or masks, but care must be taken not to increase gamma too high and crush bright white parts of the image.
Output Resolution
Choose the display resolution that the Morph outputs. Typically you would choose the highest resolution supported by your display. The exception to this is if you wish to try the black frame insertion (BFI) feature (insert data), in which case a 120hz display mode should be chosen, these resolutions have "120" next to their menu entries. Note that the Morph cannot display a 4k 120hz image.
After choosing a new resolution, you must press the OK button on the remote again to save the change. If you do not confirm the change the Morph will restore the previous screen resolution after 20 seconds.
Advanced Video
Options in this menu affect the output of the Morph4Ks video.
- Frame Lock - Engaging frame lock syncs the input refresh rate exactly with the output refresh rate. This usually results in the smoothest possible image movement/scrolling and the least amount of input lag. Setting this option to "Off (triple buffered)" disables frame lock, which will uncouple the input and output frame rates. Turning off frame lock off is essential for games which change between resolutions, such as 240p and 408i, as it will allow the Morph to re-sync the image as fast as possible.
The other two settings are "Normal" and "minimal (lowest lag)". Insert data here explaining the difference.
- BFI - Stands for "Black Frame Insertion". Turning this on causes every other frame to be black. This can improve motion clarity on some displays, at the expense of some image brightness. It is most useful when coupled with 120hz output modes and HDR injection.
- Inject HDR - High Dynamic Range is a new technology which boosts the available levels of image brightness on newer, compatible displays. HDR is particularly useful when used with scanlines, masks and black frame insertion for restoring/boosting the brightness of the image.
If your display is compatible you can turn on either HLG or HDR10 HDR modes using this menu item. There are two standards to choose from:-
- HLG - Hybrid Log Gamma, a HDR standard develpped by the BBC and Japan Broadcasting corporation.
- HDR10 - An an open, royalty-free HDR standard.
No one standard is inherently better than the other and you should choose the standard that your display handles the best.
HDR injection can affect colour accuracy. Morph includes custom Gamma remapping to compensate for this and custom gamma tables can be uploaded using the web interface (insert data).
- Inject VFR-EMP - Adds a flag to the HDMI signal to tell the display to expect a variable refresh rate image. Currently this does nothing more than add the VFR/VRR flag to the signal, which has been shown to help some TVs when handling off-spec refresh rates.
System
The system menu contains settings and preferences relating to the Morph itself.
Wifi
Use this menu to setup the Morph4K on your local WiFi access point, or to view the current status of the WiFi connection. See WiFi Setup and Web Interface for more information.
Firmware
(insert data)
OSD
(insert data)
EDID
(insert data)
Debug / Self Test
(insert data)
Snake
(insert data)
Factory Reset
(insert data)
Info
(insert data)
Restart
Use the option in this menu to restart the Morph4K.
RX Input Analyzer
Displays various diagnostic information for the current input, these pages are informational only, there are no settings to change here. The information you can view is as follows:-
- RX Status
- RX Input Timings
- RX Input Audio
- RX AVI InfoFrame
- RX SPD InfoFrame
- RX VS InfoFrame
TX Info
Displays various diagnostic information for the current output, these pages are informational only, there are no settings to change here. The information you can view is as follows:-
- TX Output
- TX SCDC Status
WiFi Setup
Connecting the Morph 4K to your WiFi network is the easiest way to check and update the firmware and allows you to access advanced features through the web interface.
To start the setup process, open the main menu by pressing the Menu/Home button on the remote, then navigate to "System" and press the OK button.
In the system menu, choose "WiFi" and press OK on the remote.
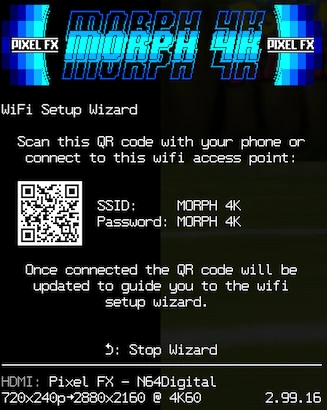
If you have never connected your Morph4K to WiFi (or if you reset the connection) there should be only one option on the menu, "Start Setup Wizard". Press the OK button on the remote. You should see the menu screen shown below:-
Morph4K will now create its own wireless access point which you can connect to using a phone or a laptop. On a smartphone, you can simply scan the QR code to connect to the WiFi access point, while on a laptop you should be able to see the network in the list of available access points.
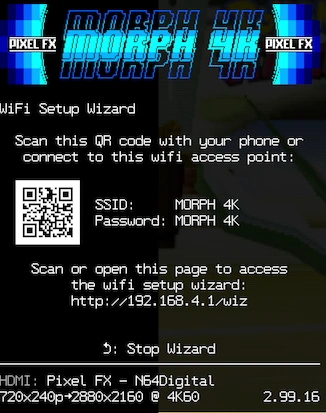
Once you have successfully connected your device to the Morph4Ks temporary WiFi network, the image will change to show a web address.
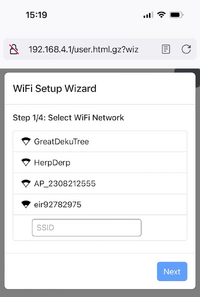
Either scan the QR code again, or enter the address manually into your web browser (including the http:// part) to open the setup wizard. The picture below shows the wizard running on a typical smartphone.
Simply work through the setup Wizard in order to connect the device to your WiFi. You will also be asked to set a username and password for the web interface, which is covered in (insert data).
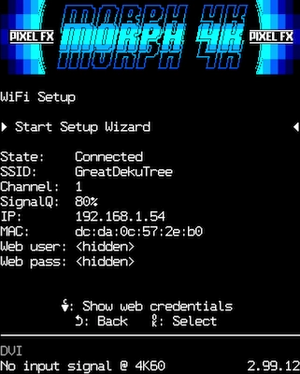
Once you complete the setup wizard you can verify that the Morph is connected to the internet by navigating to the Wifi menu again (Main Menu->System->Wifi). If it is connected, then you will see details of the devices local IP address and signal quality. If the device is not connected, try the setup procedure again and verify that you entered your WiFi password correctly.
Web Interface
Advanced settings and options can be configured from the Morph's web interface. To access this interface, the Morph must be configured as a device on your local network using the WiFi Setup.
Once this is configured, you should be able to access the web interface using the following link from any computer connected to your local network:-
If this link does not work, try entering the IP address of your morph directly. You can find the IP address using the following procedure
- Press the Menu button to open the Morph's main menu.
- Navigate to "System" and then "Wifi".
- Morph's IP address should be shown. Enter http://(your-morphs-IP-address-here) into your web browser. In the example screenshot, the user would enter http://192.168.1.54
- Log in with the credentials you set up when you completed the WiFi setup. If you need a reminder, you can use the WiFi setup menu to reveal them (how? to be confirmed)
Insert data here relating to WebUI options.
Updating Firmware
Updating via WiFi
Before updating the firmware by WiFi, you must complete the Wifi Setup.
With the Morph4K connected to the WiFi, open the main menu using the remote and choose "System" and then "Firmware".
In the Firmware menu that now opens, choose "Check for Update". If no update is available, you will see the message "Firmware is up-to-date".
If an update is available you will instead see the message "New version is available for download". Press the OK button to see the change log, and then the OK button again to commence the update process. The Morph4K will then begin downloading and installing the new firmware. Please wait for this process to finish and do not turn off your Morph at this point.
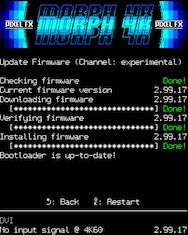
When the download is complete, you will see the message "Bootloader is up-to-date!" (as shown in the picture on the right). At this point, press the "OK" button on the remote to start the firmware installation process. The Morph4K will restart.
If the firmware is successfully installed, you will be prompted to "Press OK to mark this version as valid". If for some reason the firmware did not install or work correctly, you can press the back button on the remote, or power cycle the Morph to go back to the previous firmware.
Release Notes
Select this option if you want to read the latest release notes for the most recent firmwares. Typically these will be brief notes of bug fixes or new features.
Select Update Channel
The Morph has several "Update Channels" which may contain different versions of firmware. The channels are:-
- Stable - This is the default channel, and should contain firmware files that have been tested and proven to be stable and suitable for general use
- Testing - This channel has newer firmwares that may contain new features, these features may still be in development and therefore may have bugs or errors
- Unstable - This channel is for newer firmware still in development and is not normally available on consumer units
- Experimental - This channel is for newer, experimental firmware only and is not normally available on consumer units
Using update channels other than "Stable" may cause unexpected bugs and crashes, so most users are recommended to stick with the Stable channel.
Updating via SD card
Insert data
Using the rescue system
Insert data
Compatibility and Special Configuration
We encourage the community to add sections under each system instead of having an enormous table here. That way we can have more detailed and specific information on a per system basis, and here links to all the systems tested so far. A link to a summary page of potentially incompatible systems is found at the end of the list.
Home consoles
- Insert data
Computers
- Insert data
Arcade boards
- Insert data
Morph 4k potential incompatibilities
!! This page is work in progress !!
